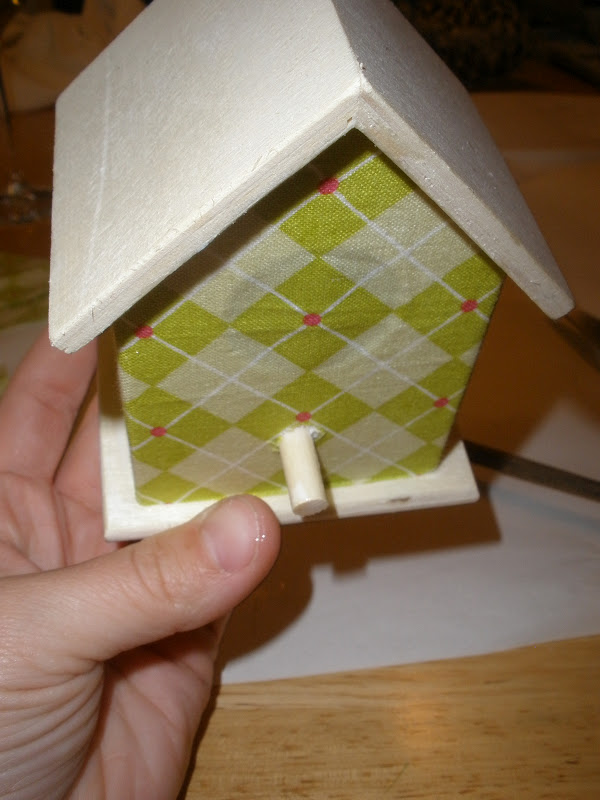
Showing posts with label Decor. Show all posts

Thursday, December 13, 2012

Beautiful 10 Minute Card Garland

 Find Lametta tinsel -- thin, flexible wire covered in shiny tufts -- it's available at craft stores or by mail order. Narrow ribbon and twine work, too; use metallic finishes for maximum shine. Drape several strands across a mirror; affix to back of frame with thumbtacks. Hang cards with 1-inch double-ring paper clips. (from marthastewart.com) 

Make a card garland and I'll send a card~
Bree and J

Pin It

Wednesday, December 12, 2012

6 Great Holiday Wreaths


Present Wreath: 
Cover small containers, such as old jewelry boxes, with weatherproof paper, which will hold up outdoors, unlike wrapping paper; seal with all-weather tape. Add decorative bands in contrasting colors, if desired, and tie with ribbon. Attach to a flat wooden wreath form (ours is 18 inches) using a hot-glue gun. Affix a satin bow.

Links to the other Wreaths:


Oh....Martha, Martha, Martha....you've done it again...or shall we say your employees have. COL!
All Wreaths Thanks to Marthastewart.com

When you can't do your own crafts find some awesome ones to share, just make sure you give credit~
Bree and J
Pin It

Tuesday, October 2, 2012

Blogger Fall Feature: Week 2 "You've been BOO'ed"

Make "You've been BOO'ed" Paper Cones for an extra touch mixed into your traditional friendly neighborhood game.
by Blue Sky Confections


Follow this link, "You've be Boo'ed" Paper Cones, by Blue Sky Confections, for more pictures and a "You've been BOO'ed" printable pdf file.

Boo~
Bree and J Pin It

Monday, October 1, 2012

Blogger Fall Feature: Week 2 "Bitten" Over the top Snow White Themed Party

"Bitten" 
Over The TOP Snow White Inspired Halloween Party
For more photos and information on 
this party design follow this link to:

This would also be a chic cocktail party (minus the spiders and apples, LOL)~
Bree and J
Pin It

Thursday, September 27, 2012

Blogger Fall Feature: Week 1 Fall Mantel

Love this Inspired Fall Mantel
by Chinstna's Adventures
More pictures on this lovely fall mantel 

Love fall's natural beauty~
Bree and J
Pin It

Wednesday, September 26, 2012

Blogger Fall Feature: Week 1 DIY Fall Wreath

Beautiful Fall Wreath Tutorial
by Shanty 2 Chic


Link for beautiful fall wreath tutorial by Shanty 2 Chic:

Your front door is the threshold to your home, make it beautiful~
Bree and J
Pin It

Thursday, July 26, 2012

5 Themed Girl Rooms

Nothing is more adorable than a "done up" girls room! Since we already brought you our top 
5 Themed Boys Rooms we decided it was only fair to do a top 5 Themed Girl Rooms! These were hard to come by let me tell you! But I was able to scrounge around and find 5 for you. Seeing as my daughter is only 1 I'm not seasoned as far as what is "IN" for girls rooms but I'm pretty sure not too much has changed. ENJOY!
For more info on the rooms pictured above follow these links:
Ballerina
Barbie (not originator)
Hello Kitty
Butterfly Room Pottery Barn Kids
Could not find link for Princess Room, sorry

Hope your inspired~
Bree and J Pin It

Wednesday, July 18, 2012

Tulle Poof/Pom Pom Tutorial

 For Medium Poofs, I measured them to be 10x10 squares. I cut 10" strips first.
 Then I took my strips and folded them so I had 10" squares and then cut the folded edges. Way faster and easier than cutting them one by one.
 Stack tulle together. For the medium poofs I used 20 pieces per poof. For smaller poofs you add less, larger you add more. Same goes for if you want your poof really dense and full.
 Pinch tulle in the middle.
 Tie off the middle with anything, floss, thread, yarn, or ribbon. Here I used thread. I tied it in a knot then tied it into a bow and double knotted it. This way when I go to add my ribbon to hang there is already a loop for me to thread ribbon through to hang.
 Gather the edges, one side at a time.
 Trim the edge so it is nice and flat to make an even looking poof ball. You can cut the edges into points as well to create a flower petal design.
 Then your patience comes! Start with one piece of tulle in each hand. Pull them in opposite directions. Repeat this method over and over until you have pulled all pieces. Make sure that after you pull two pieces and you grab another two, pull the next in the opposite direction as the ones you just did. If your pulling two pieces, call them 1 and 2 and your moving onto pieces 3 and 4, make sure piece 2 and 3 are going opposite directions.
 Add your ribbon, hang and fluff!
 Very important!!!
Look out for any tulle monsters that love to mess with the tulle! Very cute these monsters are but they can delay your project. LOL!

Post your poofs and share how they were~
Bree and J

Pin It

Tuesday, July 17, 2012

More Fabric Letters!

Baby Mehgan!
Bare letters:
 Fabric choices:
 With the polka dot one, the white was still pretty sheer, this was a PAIN in the but to have to add a double layer and make sure the polka dots matched up. But with patience and my need for perfection it turned out beautifully!
 Even though the E looks to be plain white it has alittle extra matte finish, I love this on the solid color fabrics, adds alittle depth. (hard to see from a picture)
Mehgan's Fabric Letters Featured in her BaByQ Shower

For Farm House Sisters Fabric Letter Tutorial follow this link to: 

Love doing these letters far babies and families~
Bree and J
Pin It

Monday, July 16, 2012

BaByQ Shower


Exclusive Farm House Sisters Event:
Whats a BBQ with a Baby Shower Twist???
A BaByQ!!!

Featuring the Grey Family and Dazzle Expressions!! 


Water Bottle Wrappers and Labels Thanks to Dazzle Expressions!
Dazzle Expressions did another great job on 
cupcake toppers as well!


Welcome Baby Mehgan!
Bree's Photo Fun Editor...


Please comment below on any questions, comments or info on decor! We LOVE to CHAT!

Happy BaByQ Grey Family~
Bree and Jessi
Pin It

Wednesday, July 11, 2012

Etsy Find: Chickadee Vinyl

I was cursing through Etsy last night when this vinyl time out wall decal caught my eye! How genius! I looked through the rest of her shop and she has some adorable things! 
Time Out Wall Decal
Some of my other favorites!


I could get lost in Esty...AND Pinterest~
Bree and J
Pin It

5 Themed Boys Rooms

As I have been looking and searching and looking for a few more things to use in the boys' room I stumbled upon these fabulous themed bedrooms! Can't wait to finish Brooklyn's Room and start full steam on the Boys'...in the mean time here is some room inspiration for you!


Follow these links to learn more about each bedroom:
Superhero Room AND Firetruck Room by Pottery Barn Kids (though during a recent search they now have a different superhero bedroom.)
Baseball Room
Nautical Bedroom
Surfer Bedroom

 Be Inspired~
Bree and J Pin It

Thursday, July 5, 2012

Brooklyn's Room: In Progress...Bird House

What I used:
~Birdhouse purchased at craft store for a few bucks
~Mod Podge
~Razor Knife
~Fat Quarter of Fabric

I lightly mod podge the area I was working with first, smaller areas at a time. And then I went back over the fabric with a heavier coat of mod podge to create a good seal.
The pattern on the fabric was very helpful in cutting out edges and the triangle corners.
I used a chop stick to make sure the fabric was pushed up into the small creased areas.
The MOST difficult was to cut the tiny hole for the bird post to fit through just right. It wasn't perfect but when you add the mod podge over it you cant even see the small flaws.
Drying and soon to be ready to trim!
I used a razor knife to trim out bird entrance hole and any other excess fabric from areas.
Final Look!!!

Brooklyn's Room Decor ...still in progress!!!


Gettin' there~
Bree and J Pin It
Related Posts Plugin for WordPress, Blogger...

Clubs are Cool

Vintage Revivals
Project Pinterest at the DIY Club

Sponsors

Photobucket