Showing posts with label Crafts. Show all posts

Wednesday, June 5, 2013

LBB: 10 Random Household Tips


And WHY didn't I think of this stuff!?!?! LOL!
 
 Fix your broken powder make up!
 
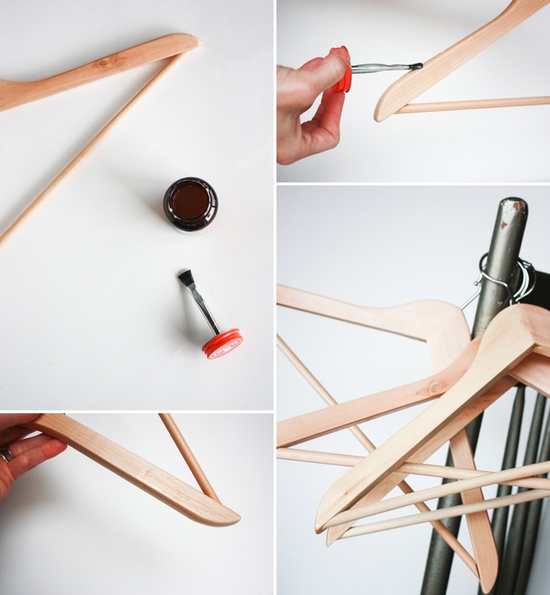
 Make your own non slip hangers!
 
 Get rid of those carpet divots with ice!
 
 No more paint splatters and drips!
 
 Use a can opener to open those difficult sealed plastic packages!!
 
For these genius ideas and more including:
Quick scan WiFi password
Secret to spotless baseboards all the time
Towel rack to hanging storage
PLUS MANY MORE!!!
Follow this link:
 
 
So random...so fun...so genius~
Bree and J
Pin It

Monday, December 17, 2012

Thank our Teachers!


With the tragic, recent Connecticut School shooting many parents are wanting to show their appreciation to the wonderful teachers that make it their priority to keep our kiddos safe!

 Here are some great ideas from last years Teacher Appreciation Week and the End of School Year Gifts! Make sure to follow the links below to see the tutorials or where to purchase these great gifts! 

Any of these would be great to say THANK YOU!
Show your teacher how great you think they are! 
Thank Them!


We can never thank our teachers, bus drivers, school administrators, and parent volunteers enough~
Bree and J
Pin It

12 Easy Christmas Treat Gift Ideas {From LBB}

Follow this link to babble for the gallery and how to:
Pin It

Thursday, December 13, 2012

Beautiful 10 Minute Card Garland

 Find Lametta tinsel -- thin, flexible wire covered in shiny tufts -- it's available at craft stores or by mail order. Narrow ribbon and twine work, too; use metallic finishes for maximum shine. Drape several strands across a mirror; affix to back of frame with thumbtacks. Hang cards with 1-inch double-ring paper clips. (from marthastewart.com) 

Make a card garland and I'll send a card~
Bree and J

Pin It

Wednesday, December 12, 2012

6 Great Holiday Wreaths


Present Wreath: 
Cover small containers, such as old jewelry boxes, with weatherproof paper, which will hold up outdoors, unlike wrapping paper; seal with all-weather tape. Add decorative bands in contrasting colors, if desired, and tie with ribbon. Attach to a flat wooden wreath form (ours is 18 inches) using a hot-glue gun. Affix a satin bow.

Links to the other Wreaths:


Oh....Martha, Martha, Martha....you've done it again...or shall we say your employees have. COL!
All Wreaths Thanks to Marthastewart.com

When you can't do your own crafts find some awesome ones to share, just make sure you give credit~
Bree and J
Pin It

Monday, October 15, 2012

Blogger Fall Feature Week 4: Spray Painted Burlap Pillow

LOVE these awesome, festive pillows!!!

Thank you "Muralmaker & More" for your helpful tutorial demonstrated here: Spraypaint Burlap Pillow


Are you festified yet??? LOL~
Bree and J
Pin It

Wednesday, October 3, 2012

FREE Halloween Printable's!!


FREE Halloween Printable Tags


Straight from "Celebrations at Home" Bloggers


Follow this link to get your FREE Halloween Printable's!!!

Great job YOU for preparing for Halloween early~
Bree and J

Pin It

Tuesday, October 2, 2012

Blogger Fall Feature: Week 2 "You've been BOO'ed"

Make "You've been BOO'ed" Paper Cones for an extra touch mixed into your traditional friendly neighborhood game.
by Blue Sky Confections


Follow this link, "You've be Boo'ed" Paper Cones, by Blue Sky Confections, for more pictures and a "You've been BOO'ed" printable pdf file.

Boo~
Bree and J Pin It

Thursday, September 13, 2012

SHOE MAKEOVER


Thank LBB Babble for this awesome DIY!!!
Follow this link for tutorial:

Get crafty~
Bree and J Pin It

Tuesday, August 14, 2012

Easy DIY Wall Art

Follow this link to:

From Our Fellow Blogger: How About Orange
Pin It

Wednesday, July 18, 2012

Tulle Poof/Pom Pom Tutorial

 For Medium Poofs, I measured them to be 10x10 squares. I cut 10" strips first.
 Then I took my strips and folded them so I had 10" squares and then cut the folded edges. Way faster and easier than cutting them one by one.
 Stack tulle together. For the medium poofs I used 20 pieces per poof. For smaller poofs you add less, larger you add more. Same goes for if you want your poof really dense and full.
 Pinch tulle in the middle.
 Tie off the middle with anything, floss, thread, yarn, or ribbon. Here I used thread. I tied it in a knot then tied it into a bow and double knotted it. This way when I go to add my ribbon to hang there is already a loop for me to thread ribbon through to hang.
 Gather the edges, one side at a time.
 Trim the edge so it is nice and flat to make an even looking poof ball. You can cut the edges into points as well to create a flower petal design.
 Then your patience comes! Start with one piece of tulle in each hand. Pull them in opposite directions. Repeat this method over and over until you have pulled all pieces. Make sure that after you pull two pieces and you grab another two, pull the next in the opposite direction as the ones you just did. If your pulling two pieces, call them 1 and 2 and your moving onto pieces 3 and 4, make sure piece 2 and 3 are going opposite directions.
 Add your ribbon, hang and fluff!
 Very important!!!
Look out for any tulle monsters that love to mess with the tulle! Very cute these monsters are but they can delay your project. LOL!

Post your poofs and share how they were~
Bree and J

Pin It

Tuesday, July 17, 2012

More Fabric Letters!

Baby Mehgan!
Bare letters:
 Fabric choices:
 With the polka dot one, the white was still pretty sheer, this was a PAIN in the but to have to add a double layer and make sure the polka dots matched up. But with patience and my need for perfection it turned out beautifully!
 Even though the E looks to be plain white it has alittle extra matte finish, I love this on the solid color fabrics, adds alittle depth. (hard to see from a picture)
Mehgan's Fabric Letters Featured in her BaByQ Shower

For Farm House Sisters Fabric Letter Tutorial follow this link to: 

Love doing these letters far babies and families~
Bree and J
Pin It

Thursday, July 5, 2012

Brooklyn's Room: In Progress...Bird House

What I used:
~Birdhouse purchased at craft store for a few bucks
~Mod Podge
~Razor Knife
~Fat Quarter of Fabric

I lightly mod podge the area I was working with first, smaller areas at a time. And then I went back over the fabric with a heavier coat of mod podge to create a good seal.
The pattern on the fabric was very helpful in cutting out edges and the triangle corners.
I used a chop stick to make sure the fabric was pushed up into the small creased areas.
The MOST difficult was to cut the tiny hole for the bird post to fit through just right. It wasn't perfect but when you add the mod podge over it you cant even see the small flaws.
Drying and soon to be ready to trim!
I used a razor knife to trim out bird entrance hole and any other excess fabric from areas.
Final Look!!!

Brooklyn's Room Decor ...still in progress!!!


Gettin' there~
Bree and J Pin It

Tuesday, July 3, 2012

Reversible Bubble Skirt Pattern by LBB


DIY PDF Pattern and Tutorial by LBB

The Reversible Bubble Skirt 

Sizes 12M to 12 Years

$6.50


 Follow this link Reversible Bubble Skirt Pattern to purchase and download now!
Thanks LBB love the site!

I think this will have to be my first attempt at sewing clothing...too cute..~
Bree and J

Pin It
Related Posts Plugin for WordPress, Blogger...

Clubs are Cool

Vintage Revivals
Project Pinterest at the DIY Club

Sponsors

Photobucket