Showing posts with label DIY. Show all posts

Thursday, July 5, 2012

Brooklyn's Room: In Progress...Bird House

What I used:
~Birdhouse purchased at craft store for a few bucks
~Mod Podge
~Razor Knife
~Fat Quarter of Fabric

I lightly mod podge the area I was working with first, smaller areas at a time. And then I went back over the fabric with a heavier coat of mod podge to create a good seal.
The pattern on the fabric was very helpful in cutting out edges and the triangle corners.
I used a chop stick to make sure the fabric was pushed up into the small creased areas.
The MOST difficult was to cut the tiny hole for the bird post to fit through just right. It wasn't perfect but when you add the mod podge over it you cant even see the small flaws.
Drying and soon to be ready to trim!
I used a razor knife to trim out bird entrance hole and any other excess fabric from areas.
Final Look!!!

Brooklyn's Room Decor ...still in progress!!!


Gettin' there~
Bree and J Pin It

Tuesday, July 3, 2012

Reversible Bubble Skirt Pattern by LBB


DIY PDF Pattern and Tutorial by LBB

The Reversible Bubble Skirt 

Sizes 12M to 12 Years

$6.50


 Follow this link Reversible Bubble Skirt Pattern to purchase and download now!
Thanks LBB love the site!

I think this will have to be my first attempt at sewing clothing...too cute..~
Bree and J

Pin It

Monday, July 2, 2012

Easy 4th of July DIY


From living in the apartment and having NO storage space I had no 4th of July Decor AT ALL! I know, I know...horrible right! 
So I was alittle bored and decided to make something using what I had around the house. Patriotic fabric, raffia, jar lids, old wood wreaths, and good ol hot glue.

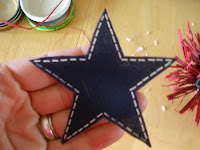
Baby food lids. I took the rafia and glued it in a criss crossing fashion then glued a fabic star cut out over the middle. Once star was placed a went back and trimmed the raffia...like giving it a hair cut. LOL.


  I then did the same thing with white wide ribbon.


 And again with cut blue fabric scraps.


Jessi had these old wooden wreaths she had painted green. I took them (lol) and we had some metallic blue spray paint we covered the wreaths with. 
I also added little extras in with the star jar lids, just with plain scrap fabric, hot glue and other jar lids.
I then fastened all the wreaths together with white ribbon and hung them.
(thanks to Jessi and my indecisiveness) I later removed the top ribbon from design.
Annnnnd whaaaalaaa! I have myself a 4th of July Wreath/Door Decor!

Be creative~
Bree and J


Pin It

Thursday, June 28, 2012

Brooklyn's Room: In Progress...Mod Podge Fabric Initials

Super Simple and Fun Craft
What you need:
Mod Podge
Fabric
Letters
Razor Blade or Razor Knife
Paint Brush (optional, I have used my finger before...but this gets messy!)

 Add a light layer of mod podge onto letter, if your using card board letters apply an even lighter coat. The purpose of this is to just hold down the fabric while you mod podge over it. Applying a thick layer may cause the card board to get soggy...this can even happen with the wood letters. Make sure to check the quality of each letter before purchase.
 Place fabric onto letter. If you have a pattern make sure you line it up or keep the fabrics design in mind.
 Add a good (thick) layer over fabric. Make sure to extend mod podge over the edges a tiny bit but don't leave a lip or too much excess on edge.
 Then I used the razor knife to cut along edges, make sure to take your time so you don't have an edge that starts to fray. Don't worry, if you do just add alittle mod podge over the area. I applied a light layer of mod podge to all edges after cutting but this isn't necessary. 
I also added an extra layer of fabric because my fabric was white and with only one layer it was alittle see threw. This all depends on fabric and letter your using.

I think I may add one m ore little hoop at the bottom of the right green one but still not sure...need to find the little hoop first but would love any feedback and what you think...
Yes add one more little hoop or no it looks great!

(its also really hard to see but the wall color is yellow and the white letters do stand out a bit more. Better pics to come with final viewing of her room!!!)
To view tutorial on the hoop decor follow this link: Brooklyn's Room: In Progress...Hoop Decor.
Hoop Fantastic~
Bree and J Pin It

Wednesday, June 27, 2012

Brooklyn's Room: In Progress...Hoop Decor

By using embroidery hoops you can simply add fabric to create a beautiful design for your wall.
 Pick your fabrics and gather your hoops. I wanted a mixture of hoop sizes. Smaller ones are hard to find. Goodwill is always an inexpensive place to find them sometimes.
 Iron your fabric.
 Place hoop to get an idea of where to place bottom hoop. You want to make sure you leave a good 1 1/2" because when you press down the top hoop the fabric will shorten up on the sides.
 Place your bottom hoop under the fabric.
 Then press down the top hoop and tighten the ring so its secure.
 After it's tightened, trim the sides for easier handling.
 Glue the sides of fabric, I used hot glue but I've seen where people use Elmers.
 Press down fabric on glued edge.
This is what it looks like after all fabric is glued. You can then go back around and trim up more. 
Then hang in whatever way you like. The space in the middle of hoops will have her initials going down diagonally. 

Have a Hoopy Day~ LOL
Bree and J

Pin It

Thursday, June 21, 2012

Secret DIY tab...

Not sure if you noticed but I didn't see that Jessi had put these up...hope it hasn't been up too long and I just didn't see...LOL....love you Jess! Any who have you checked out these furniture redo's filled under our DIY tab along the top of the blog?? Soon to add more....but in the mean time check these oldies but goodies out! Jessi did these back when she was a lone blogger out there in the scary blogger world....thank goodness I came along! LMAO!!!!

Bench Redo
 Dresser Redo
Always fun to find new things~
Bree and J

Pin It

Wednesday, June 20, 2012

Jessi's Garage: Part 1

Yesterday we took ALL day to go through Jessi's Garage...its a place of dreams...a place of crafting...talking, fun, laughing and yes...even farting! LOL!
Our main goal was to sort and organize anything that we can use for our garage sale this weekend AND throw un needed things away! (Always hard without support...that's where I came in!)
We sure had fun!
Alright I know what this needs.....
...some chamomile tea.

Fun Stuff we found...
Hand made Homecoming skirt by Jessi's mom and grandma! So sweet!
Ya...it's alittle old...lol!!!
 Weird...ODD...extremely narrow "cultural" shoes...I couldn't believe she actually bought these..they were so narrow not even a dolls foot could fit!
 I WANT this chair that she also happens to love! Boo!


Awesome Jars O Junk!
 Vintage Toys!!!
 Who needs and army stretcher???

 A bag of Barbie's...beheaded,  broken, missing limbs and plain weird...I'd say that's trash Jess! LOL
 A fur shrug for those practical cold winter days!
We all need a bald headed Cleopatra porcelain over sized doll head! 
How else would I see how my glasses  and hair bands match??


 I took a box home with me of junk that I wanted but the best thing I brought home was this scorpion for Bradley! He was so surprised and excited!!

Next is mine...bah~
Bree and J

Pin It
Related Posts Plugin for WordPress, Blogger...

Clubs are Cool

Vintage Revivals
Project Pinterest at the DIY Club

Sponsors

Photobucket